
Your brakes are your primary line of defense on the road. Learn how to perform routine safety audits, inspect brake pads, and maintain both rim and disc setups for maximum stopping power.
Whether you commute daily through heavy urban traffic, tackle high-speed mountain descents, or cruise suburban bike paths, your braking system is the single most critical safety component on your bicycle. Yet, brake maintenance is frequently overlooked until a scary moment occurs—such as a lever pulling all the way to the handlebars, loud screeching during sudden stops, or a noticeable drop in stopping distance.
Modern bicycles generally utilize one of two main braking systems: traditional mechanical rim brakes or modern disc brakes (available in both mechanical cable-actuated and hydraulic formats). Both systems offer distinct advantages, but each requires specific inspection routines to remain operating at peak efficiency. In this comprehensive inspect bike brakes safety guide, we break down step-by-step procedures for auditing your brake pads, rotors, rims, cables, and hydraulic lines so you can ride with complete confidence.
Anatomy of Stopping Power: Rim Brakes vs. Disc Brakes
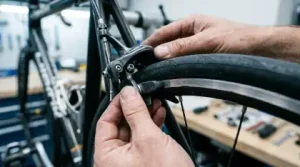 To perform an effective safety audit, it helps to understand the fundamental mechanical differences between rim and disc systems:
- Rim Brakes (Caliper, V-Brake, Cantilever): Apply friction directly to the outer metal or carbon rim of the bicycle wheel using rubber compound brake pads. They are lightweight, mechanically simple, and easy to service roadside, but performance can degrade in wet or muddy conditions.
- Disc Brakes (Mechanical & Hydraulic): Apply friction to a dedicated steel rotor mounted directly to the wheel hub. Hydraulic disc brakes utilize sealed fluid lines (DOT fluid or mineral oil) to push pistons, offering superior stopping power, modulation, and all-weather reliability regardless of rim condition.
Comprehensive Rim Brake Inspection & Safety Checklist
If your bicycle is equipped with traditional caliper or V-brakes, follow this multi-step audit before heading out on long rides:
1. Check Brake Pad Wear & Grooves
Most rim brake pads feature molded directional channels designed to channel water and road debris away from the braking surface. Inspect the pad face visually: if the tread grooves have worn down smooth or if the pad thickness is under 1.5 mm, replace the pads immediately. Inspect the rubber closely for embedded metal shavings, grit, or glass shards picked up from the street, as these will gouge and ruin your aluminum wheel rim over time.
2. Verify Pad Alignment and Toe-In
Improperly aligned pads reduce stopping power and cause severe brake squeal. Ensure the brake pad contacts the center of the wheel rim’s braking track cleanly. The pad must never touch the rubber tire (which can cause a high-speed sidewall blowout) or slip underneath the rim into the spokes. Set a subtle “toe-in”—where the front edge of the pad contacts the rim approximately 0.5 mm before the rear edge—to eliminate chatter and noise.
3. Audit Wheel Rim Wear
Remember that on rim-brake bicycles, the wheel rim itself is a wearing component. Inspect the rim’s braking surface for concave grooving or wear-indicator dimples. Riding on severely worn rims can cause the sidewall of the wheel rim to split open under tire pressure. Refer to national safety checklists provided by the National Highway Traffic Safety Administration (NHTSA) for guidelines on inspecting structural component wear.
Comprehensive Disc Brake Inspection & Safety Checklist
Disc brakes deliver immense stopping power, but their tight tolerances require careful attention to contamination and alignment:
- Measure Disc Pad Thickness: Remove the wheel to view the pad material inside the caliper. Disc brake pads consist of a metal backing plate bonded to an organic, metallic, or semi-metallic friction compound. If the friction material wears thinner than 1.0 mm (roughly the thickness of a dime), replace both pads immediately. Allowing the metal backing plate to strike the rotor causes permanent structural damage to the rotor.
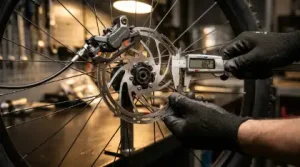
- Inspect Rotors for Wear and True: Measure your rotor thickness using a digital caliper. Most standard rotors start at 1.8 mm thick and must be replaced once worn down to 1.5 mm (minimum thickness is typically stamped directly onto the rotor face). Spin the wheel to check for rotor wobble; slight bends can be gently straightened using a clean rotor truing fork.
- Eliminate Contamination & Squeal: Never touch the friction face of a disc rotor or pad with bare fingers, as skin oils cause severe pad glazing and loud squealing. Clean oily rotors using 90%+ isopropyl alcohol or dedicated aerosol brake cleaner.
- Test Hydraulic Lever Feel (Check for Air): Squeeze your hydraulic brake levers firmly. If the lever feels soft, spongy, or pulls completely to the handlebar grip, air bubbles have entered the sealed fluid system. You must perform a fluid bleed to restore firm lever feel and full hydraulic pressure.
Comparison: Rim Brakes vs. Disc Brakes Maintenance Requirements
| Maintenance Task | Rim Brake Systems | Disc Brake Systems |
|---|---|---|
| Pad Replacement Ease | Very Simple (Standard Allen Key) | Moderate (Requires Pin/Retainer Removal) |
| Wet Weather Performance | Reduced (Requires longer stopping distance) | Exceptional (Consistent bite and power) |
| Fluid Bleeding Required? | No (Mechanical cable tension only) | Yes (Hydraulic systems every 1–2 years) |
| Primary Wear Component | Brake Pads & Wheel Rim Surface | Brake Pads & Steel Hub Rotors |
Checking Brake Cables & Housing Tension
For both mechanical rim and mechanical disc brakes, cable condition directly impacts lever response. Inspect the steel inner cables along their entire length—especially near the lever anchor and caliper pinch bolt—for frayed strands, rust, or kinked housing. Frayed brake cables can snap without warning under emergency panic braking.
Check cable housing tension by turning the barrel adjuster at the caliper or lever lever perch. If you must unscrew the barrel adjuster all the way out to achieve firm lever response, loosen the main cable pinch bolt, pull the slack through using pliers, and re-clamp the cable firmly. For technical standards on mechanical tension safety, consult urban cycling guides hosted by the Pedestrian and Bicycle Information Center.
Final Thoughts
A quick 5-minute brake inspection before major rides prevents costly mechanical failures and ensures you can stop safely when unexpected hazards arise. By regularly auditing pad wear, checking rotor thickness, maintaining proper cable tension, and keeping friction surfaces clean, you keep your bicycle performing smoothly and safely on every journey.